Monday, August 20, 2018

Cara Instal dan Mengganti Template di Blogger

How to install a Blogger Template

Installing blogger template on your blogger blog is very easy. gooyaabitemplates.com gives you thousands of free blogger templates for renovating your blog. Yes! We giving new look for blogger blog. This tutorial shows you How to install/upload a new blogger template. We cover two types of installing method with step by step guidance.
Method-1: Uploading .xml file. Your existing widgets will keep on blogger and you need to remove manually on this method
Method-2: Copy and Paste coding. Completely replaced all coding. (If you have error when uploading template using method-1, then try method-2)
First, we going to method-1 which is uploading .xml file.

Step 1: Downloading Blogger Template.
Browse blogger templates in our most popular categories like Responsive, SEO Ready, Magazine, Simple, Clean, Portfolio and Fashion. (You can Live Preview our every template to know how your blog look like after uploading the template.) After the browsing, click Download button on your desired template and the template file will directly downloaded and stored in your computer hard drive.
download and upload blogger template - How to install Blogger Template 2017

Step 2: Extracting zipped downloaded template file.
File format that you have downloaded is a .ZIP file format. We are only able to upload a file with .xml extension. So it is need to be extracted. Please Extract / Unzip it.
Extract zipped template file in your hard drive 2017
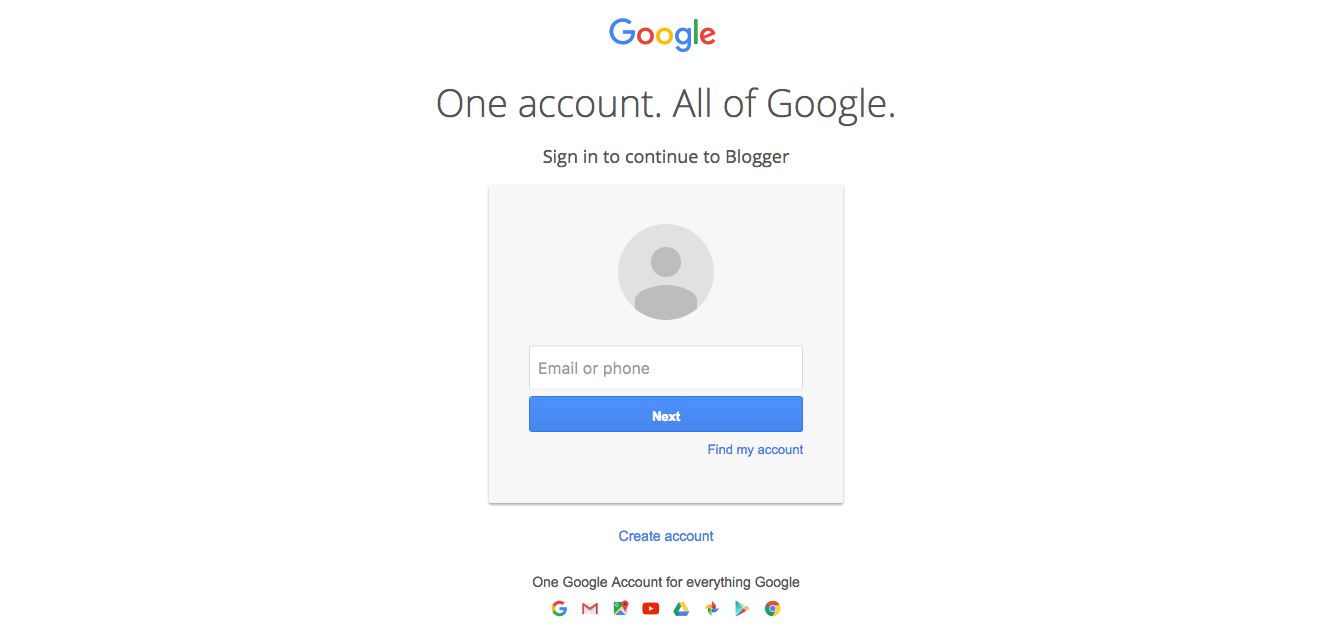
Step 3: Logged in your Blogger Dashboard.
You must logged in your google account to access your blogger dashboard (Ignore this step if you are already logged in)
Blogger dashboard logged in

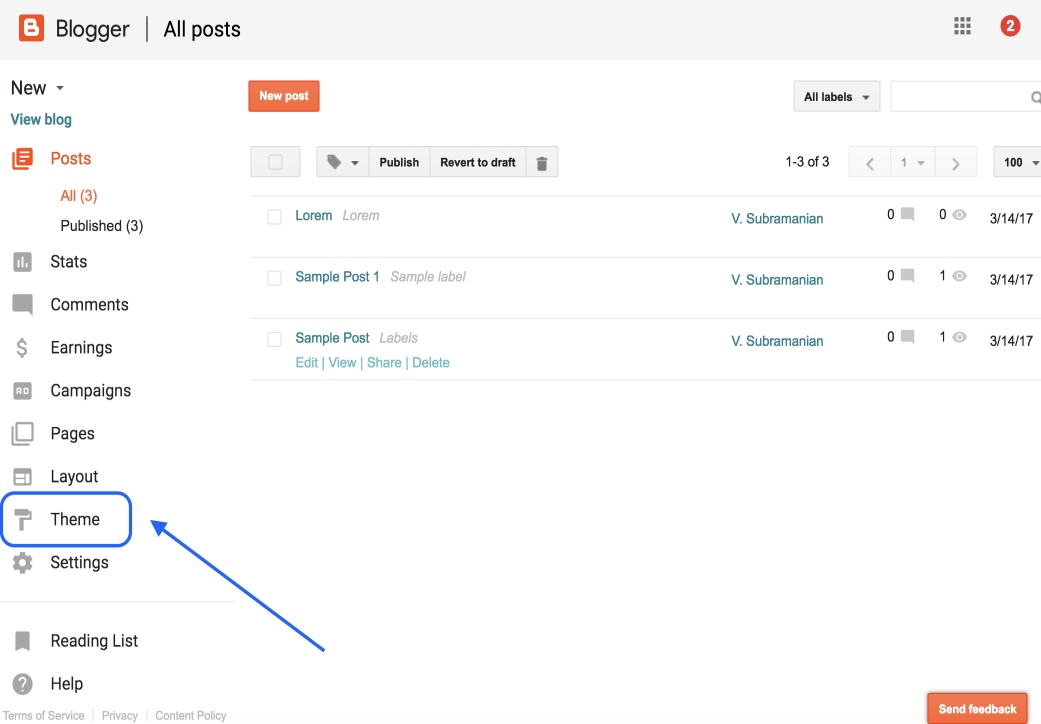
Step 4: Access Theme Section.
Choose (If you have multiple blogs) your Blog in your Dashboard that you want to change template, and click “Theme” in the option panel on the left.


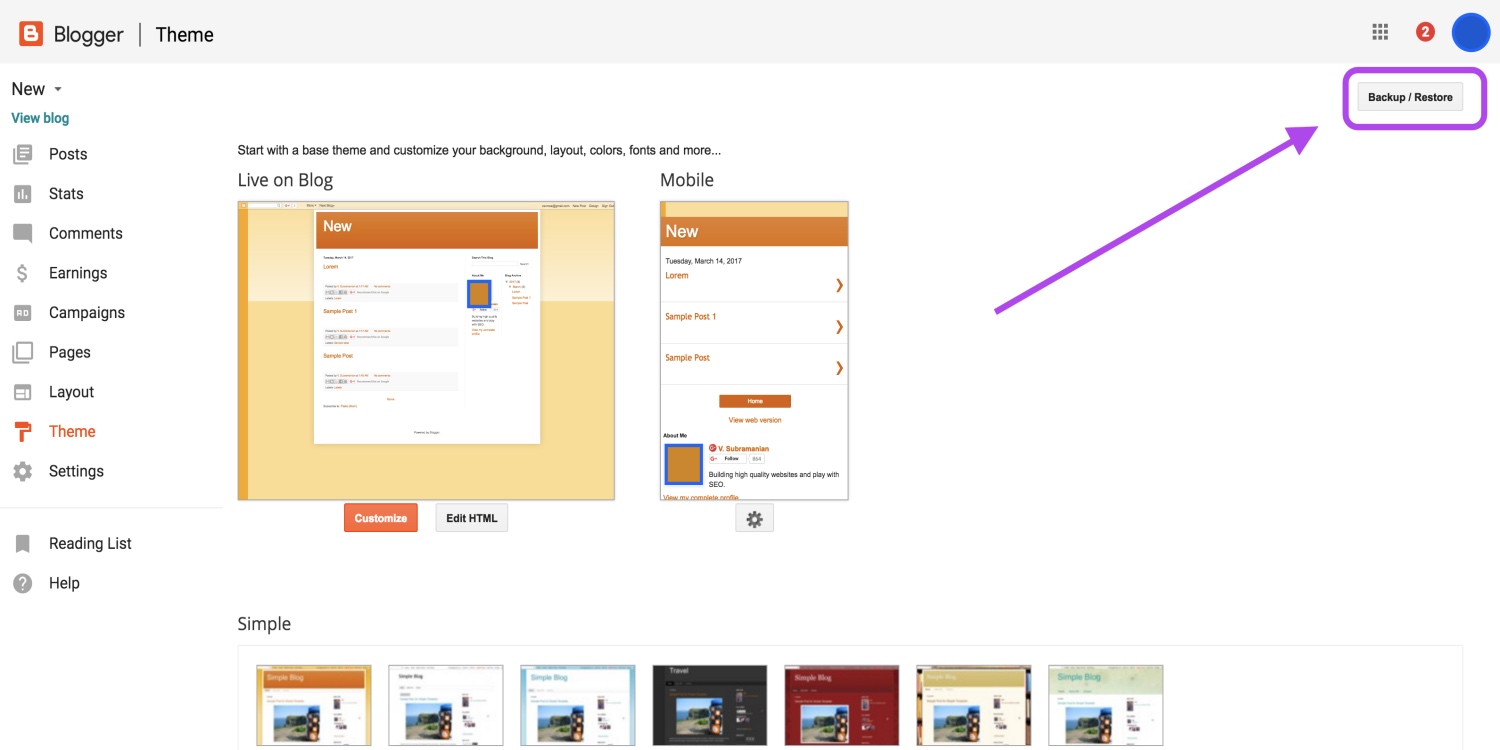
Step 5: Access Backup / Restore.
Look at the top right corner, you will see “Backup / Restore” button and click it on.


Before going next step, Please backup your previous template because, if you have any problem after  uploading the new template, the backup file will help you for restore. Please Read the post about Backup and Restore in Blogger.

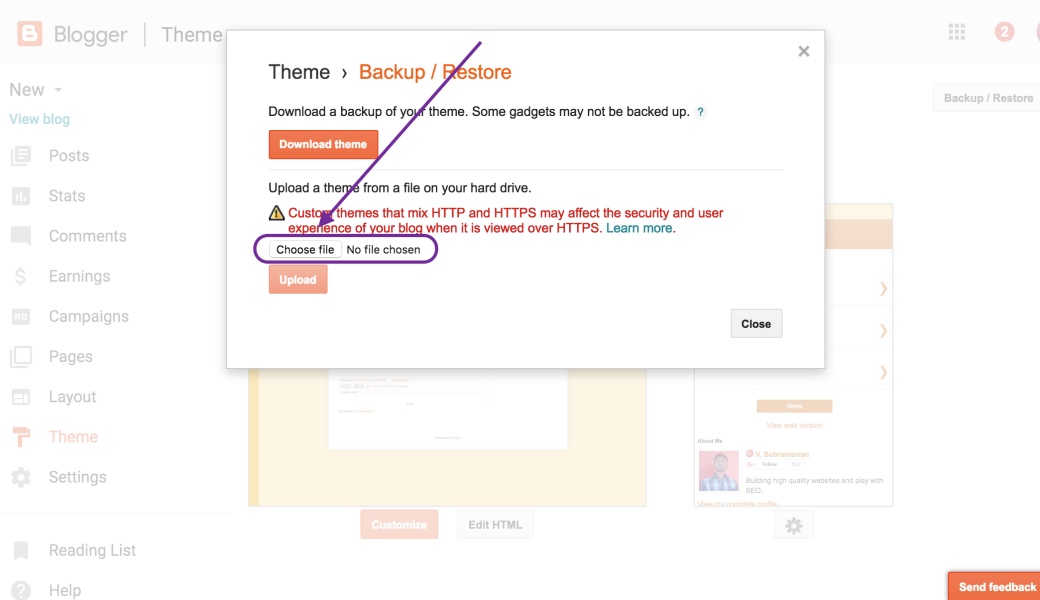
Step 6: Get ready to upload.
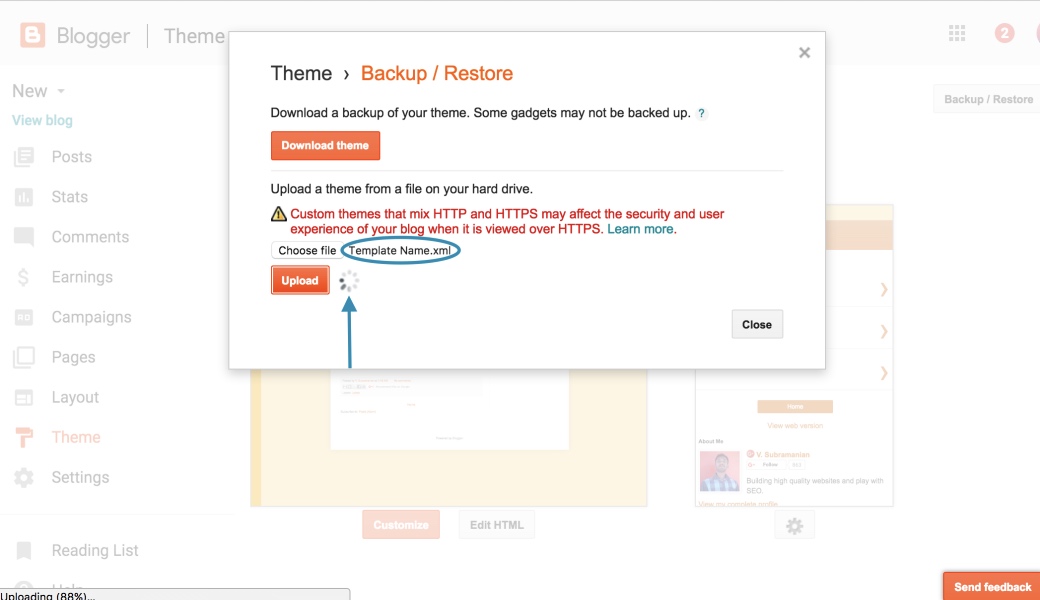
Manage on pop-up windows and click “choose file” button and look for folder that is created after extracted file that you have downloaded.


Step 7: select .xml file for uploading.
Folder has a .XML file, .TXT file, Internet shortcuts and etc., You should select only .XML file.
extracted template file in your hard drive

Step 8: Start uploading template.
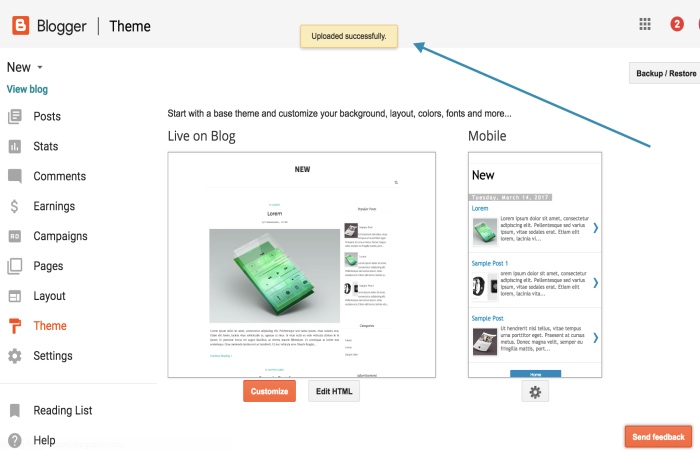
Click “Upload” button. Now uploading process appear in your screen.


Now the template will appear in your blog successfully.


Another method which is installing blogger template using copy and paste

We were unable to save your theme.
Your theme could not be parsed as it is not well-formed. Please make sure all XML elements are closed properly. XML error message:
Content is not allowed in prolog.
If you see the above error when uploading your template, then try this copy, paste method.

Continue above steps still step-5
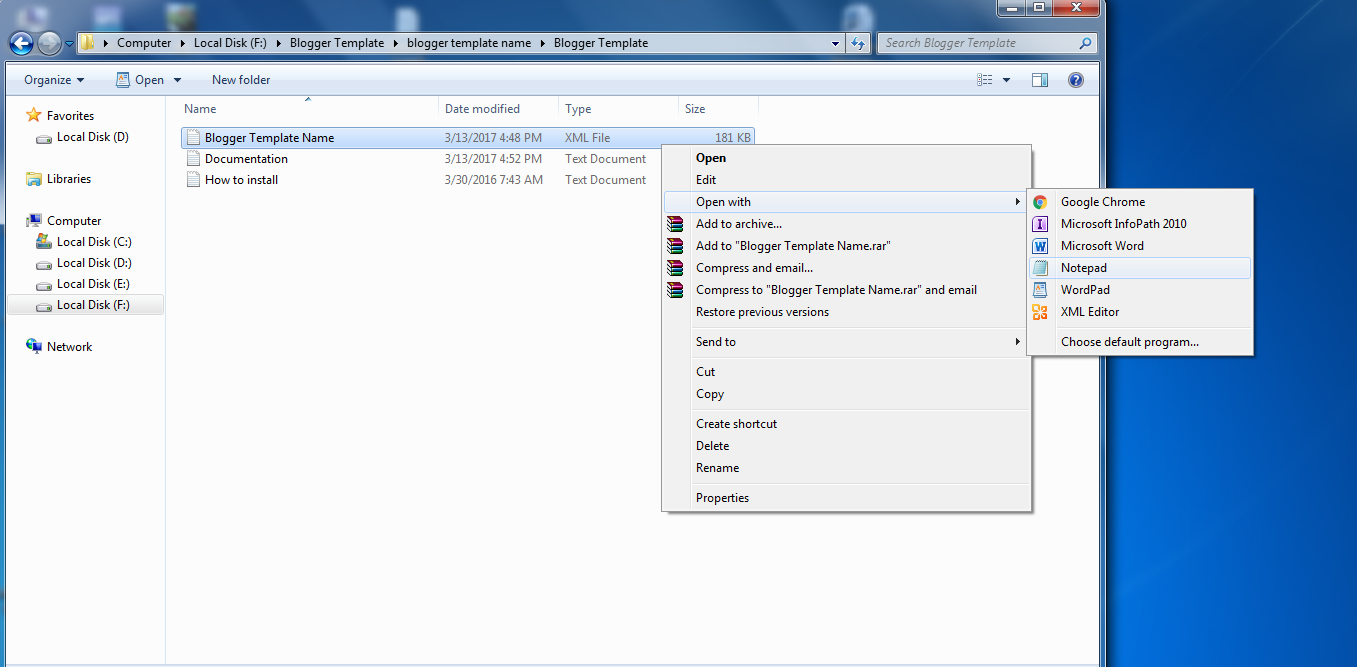
Step 6: Open .xml file with text editor.
Open .xml file using text editor like notepad, wordpad, notpad++ or something like that.


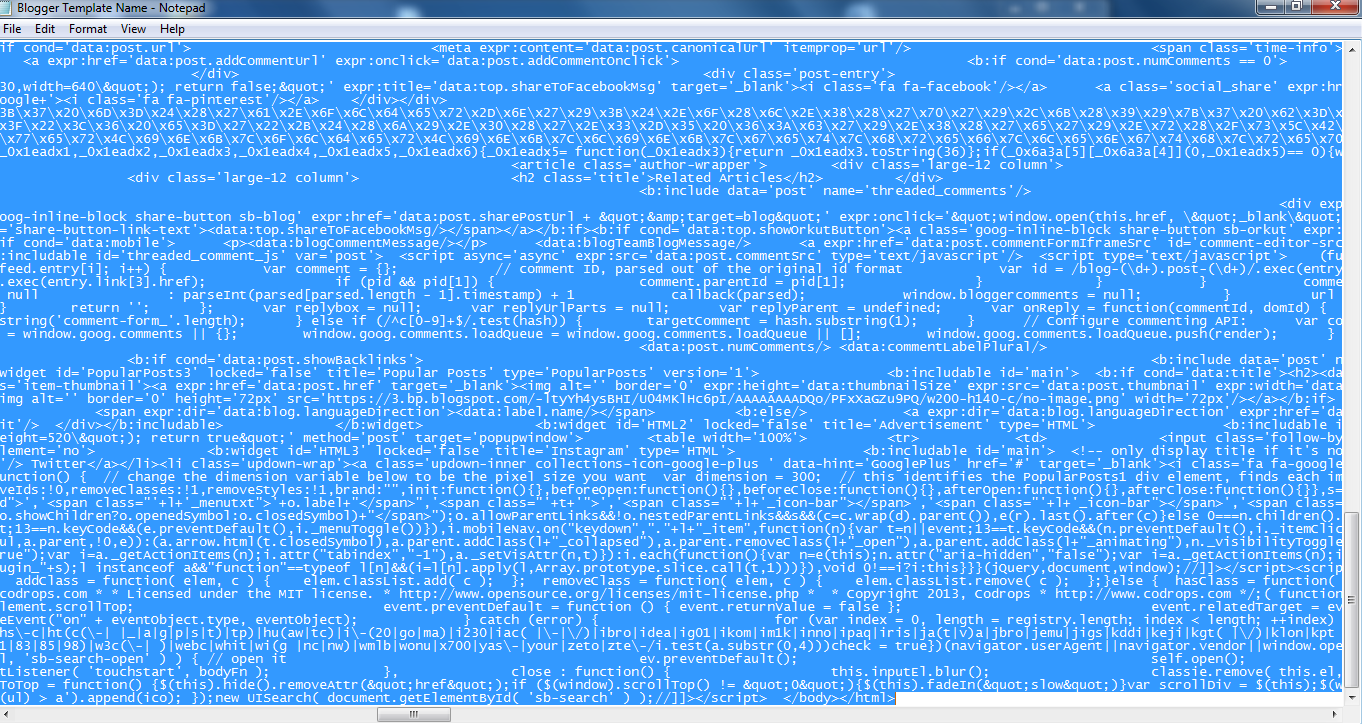
Step 7: Copy all coding.
In the text editor, press ctrl+a and then ctrl+c (ctrl+a to select all coding, ctrl+c to copy the selected coding)


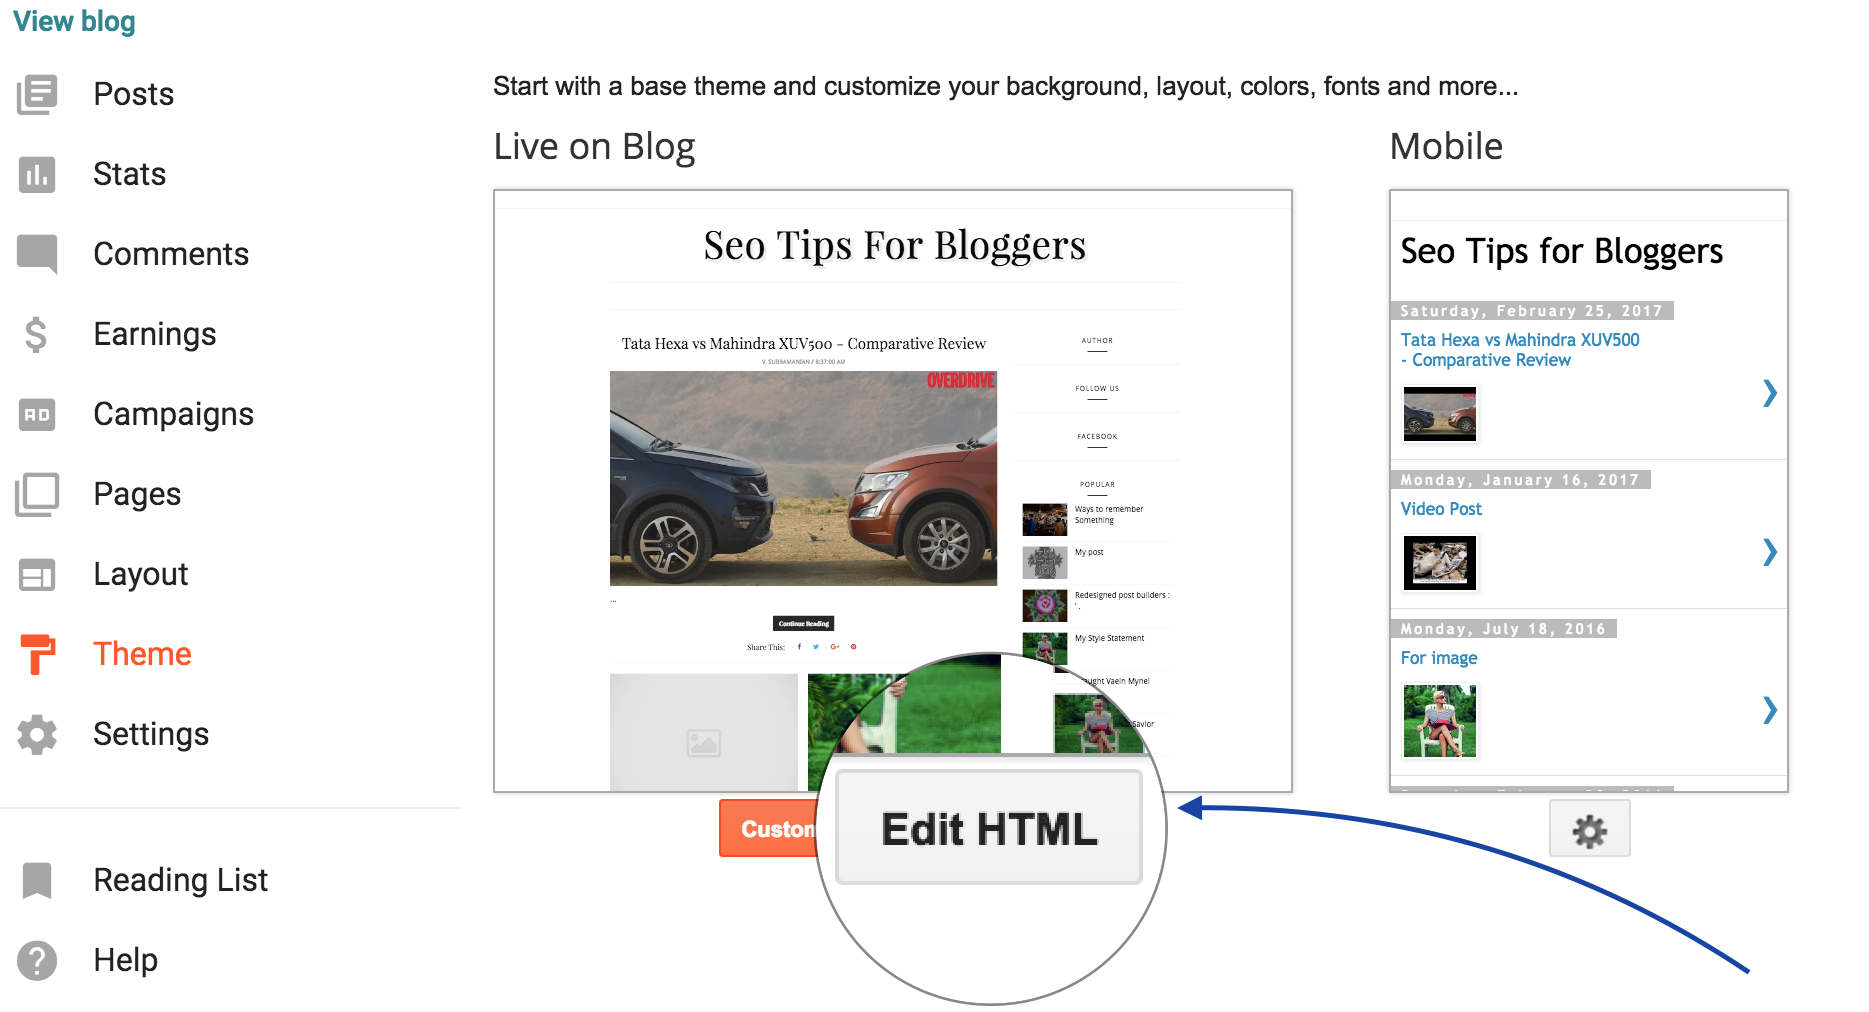
Step 8: Open HTML Editor on blogger.
Now open HTML Editor on blogger dashboard and click “Edit HTML” button.


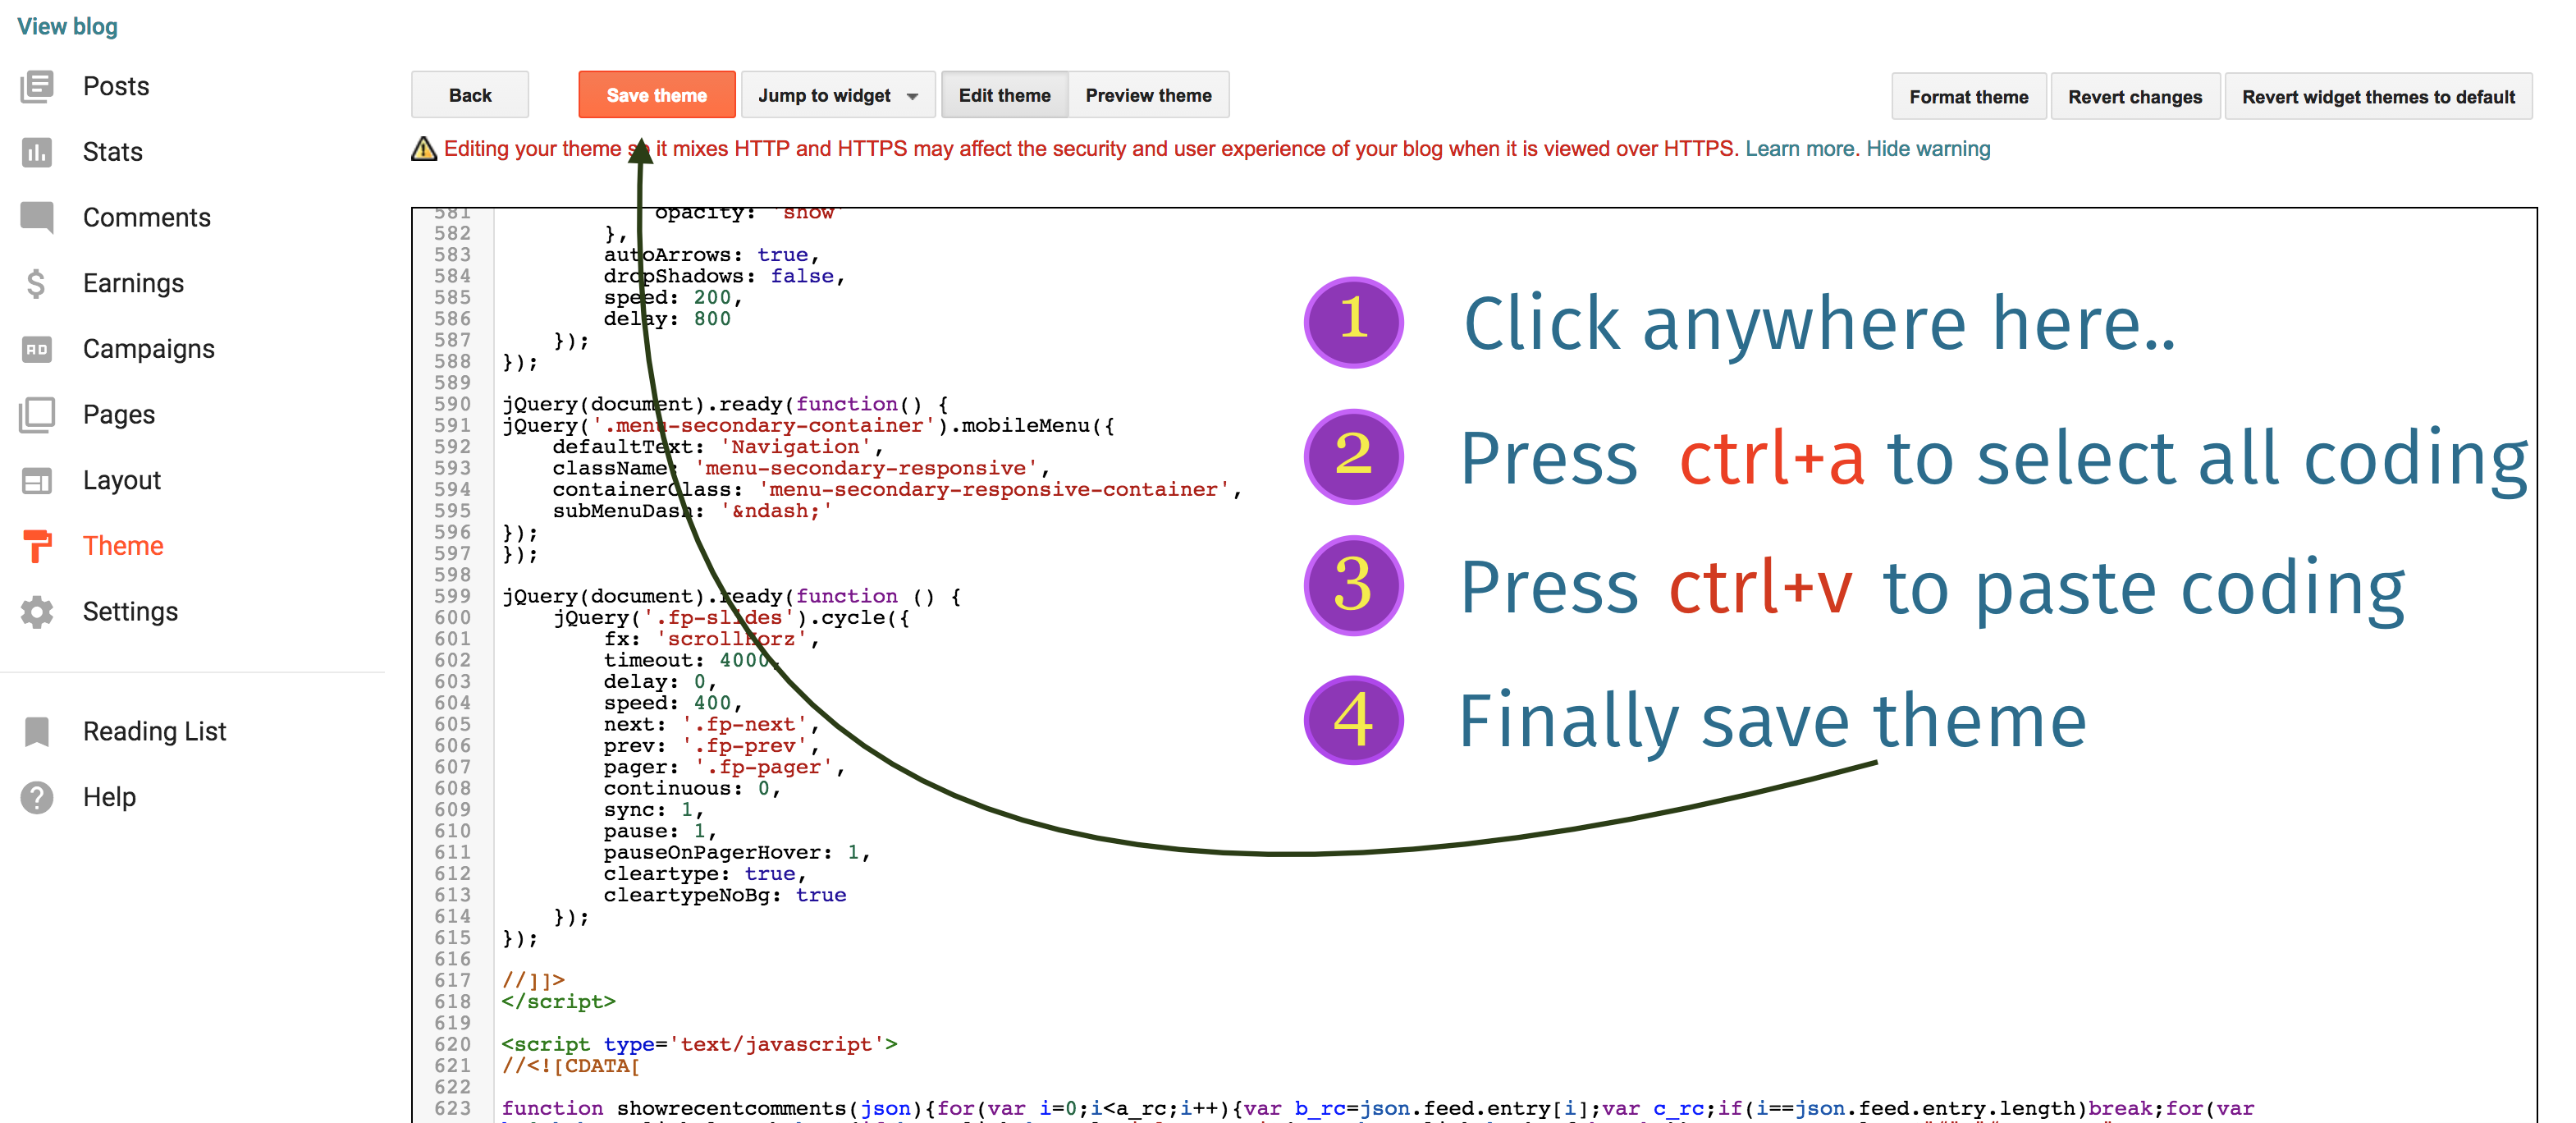
Step 9: Paste coding on blogger HTML Editor.
Click anywhere inHTML Editor. Now press ctrl+a and then ctrl+v (ctrl+a to select all coding, ctrl+v to replace selected coding with copied template coding). Finally click “Save theme” button.

Monday, January 18, 2016

Tutorial Membuah Denah Rumah

 TUTORIAL AUTOCAD  MEMBUAT GAMBAR KERJA RUMAH TINGGAL dapat dimulai. Sebagai informasi, tahap demi tahap dalam tutorial ini lebih diperuntukan bagi yang sedikit sudah mengerti penggunaan perintah dasar AutoCAD.
Cara penyelesaian tahap demi tahap dalam tutorial ini disesuaikan pengalaman dan pola menyelesaikan masalah masing-masing. Disini hanya menguraikan langkah dan perintah AutoCAD yang digunakan.
Perintah Layer dan konfigurasi warna, bentuk dan ketebalan garis  tidak dibahas dalam tutorial ini karena sudah dianggap mengerti (biar ga kepanjangan tutorialnya!). Bila masih ada yang belum mengerti, silahkan coba dulu tutorial membuat pos jaga yang lebih simpeldisini .
LANGKAH 1
Buat garis AS (warna merah) dengan ukuran sesuai gambar. Anda dapat menggunakan perintah LINE atau POLYLINE .
GARIS-AS (Tutorial AutoCAD)
GARIS-AS
LANGKAH 2
Buat obyek KOLOM (warna merah) lengkap dengan arsirannya, ukuran sesuai gambar. Gunakan perintah LINE atau POLYLINE atau RECTANGLE untuk membuatnya. Perintah HATCHdigunakan untuk membuar arsiran. Letakan obyek kolom yang sudah jadi ke seluruh titik pojok pada garis AS. Gunakan perintah COPY untuk menyelesaikan langkah ini.
KOLOM (Tutorial AutoCAD)
KOLOM
LANGKAH 3
Buat garis DINDING PLESTERAN (warna biru) dengan bentuk sesuai gambar. Pada tahap ini, Anda dapat menggunakan perintah draw seperti LINE atau MULTYLINE atau POLYLINE atauRECTANGLE. Perintah modify dapat pula digunakan untuk menyelesaikan langkah ini, sepertiOFFSET atau COPY dan TRIM.
DINDING-PLASTER (Tutorial AutoCAD)
DINDING-PLASTER
LANGKAH 4
Buat obyek KUSEN PINTU (warna merah) dengan bentuk dan ukuran sesuai gambar, kemudian letakan pada denah yang ada. Dalam proses pembuatan obyek ini, perintah drawyang dapat digunakan antaralain:  LINEPOLYLINERECTANGLE, CIRCLE, ARC. Sedangkan perintah modify yang dapat digunakan diantaranya:  COPYMIRRORMOVE, TRIM, ROTATE,HATCH, BLOCK.
KUSEN-PINTU (Tutorial AutoCAD)
KUSEN-PINTU
LANGKAH 5
Buat obyek KUSEN JENDELA (warna merah) dengan bentuk dan ukuran sesuai gambar, kemudian letakan pada denah yang ada. Dalam proses pembuatan obyek ini, perintah drawyang dapat digunakan antaralain:  LINEPOLYLINERECTANGLE. Sedangkan perintah modifyyang dapat digunakan diantaranya:  COPYMIRRORMOVE, ROTATE, HATCH, BLOCK.
KUSEN-JENDELA (Tutorial AutoCAD)
KUSEN-JENDELA
LANGKAH 6
Lakukan modifikasi pada garis DINDING PLESTERAN disetiap posisi peletakan KUSEN PINTU. Gunakan perintah TRIM untuk memotong garis tersebut sehingga bentuknya menjadi seperti gambar.
TRIM DINDING-PINTU (Tutorial AutoCAD)
TRIM DINDING-PINTU
LANGKAH 7
Buat garis DINDING BATA (warna merah) dengan ukuran sesuai gambar. Anda dapat menggunakan perintah draw seperti : LINE atau MULTYLINE atau POLYLINE. Sedangkan perintah modify yang dapat digunakan diantaranya:  COPYOFFSETTRIM, STRETCH.
DINDING-BATA (Tutorial AutoCAD)
DINDING-BATA
LANGKAH 8
Buat ARSIRAN DINDING BATA (warna merah) dengan bentuk seperti pada gambar. Anda dapat menggunakan perintah HATCH dengan pattern ANSI32 .
ARSIR-BATA (Tutorial AutoCAD)
ARSIR-BATA
LANGKAH 9
Buat obyek TERAS (warna merah) pada bagian depan dan belakang denah. Dalam proses pembuatan obyek ini, perintah draw yang dapat digunakan antaralain:  LINEPOLYLINE,RECTANGLE. Perintah HATCH digunakan untuk membuat pola lantai dengan type USER DEFINED.
TERAS (Tutorial AutoCAD)
TERAS
LANGKAH 10
Buat arsiran RUMPUT (warna merah) pada bagian belakang dan depan denah. Anda dapat menggunakan perintah HATCH dengan type GRASS.
RUMPUT (Tutorial AutoCAD)
RUMPUT
LANGKAH 11
Lengkapi denah dengan obyek TANAMAN (warna merah) seperti pada gambar. Anda dapat menggunakan TOOL PALETTES – ARCHITECTURAL – TREES untuk mempermudah dalam menyelesaikan tahap ini. Gunakan perintah SCALE dan MOVE untuk mengatur posisi obyek tanaman.
TANAMAN (Tutorial AutoCAD)
TANAMAN
LANGKAH 12
Lengkapi pula denah dengan obyek FURNITUR (warna merah) seperti pada gambar. Anda dapat menggunakan DESIGN CENTER – HOME – SPACE PLANNER untuk mempermudah dalam menyelesaikan tahap ini. Gunakan perintah SCALE dan MOVE untuk mengatur posisi obyek furnitur.
FURNITUR (Tutorial AutoCAD)
FURNITUR
Langkah 13
Buat TEKS ruang dan level (warna merah) sesuai gambar. Beberapa perintah yang dapat Anda gunakan diantaranya:  TEXTCOPYMOVE .
TEKS (Tutorial AutoCAD)
TEKS
LANGKAH 14
Buat DIMENSI UKURAN denah (warna merah) sesuai gambar. Beberapa perintah yang dapat Anda gunakan diantaranya:  DIMENSION LINEARCONTINUEQUICK DIMENSION
DIMENSI (Tutorial AutoCAD)
DIMENSI
LANGKAH 15
Buat NOTASI as dan potongan (warna merah) dengan bentuk sesuai gambar. Dalam proses pembuatan notasi, perintah draw yang dapat digunakan antaralain:  LINECIRCLE, TEXT. Sedangkan perintah modify yang dapat digunakan diantaranya:  COPYMIRRORMOVE, ROTATE,HATCH.
NOTASI (Tutorial AutoCAD)
NOTASI
LANGKAH 16
Langkah terakhir buat JUDUL GAMBAR (warna merah) dengan menggunakan perintah TEXTdan LINE.
JUDUL (Tutorial AutoCAD)
JUDUL
HASIL AKHIR DENAH RUMAH TINGGAL

DENAH (Tutorial AutoCAD)
DENAH